Have you ever wondered how to install those custom maps from Steam’s Workshop hub?
Before we start, we will assume that you already have a workshop collection with custom content associated with it, this post is intended to guide you through the process of how to add it to your EnviousHost CS:GO server.
ABOUT – THE WORKSHOP – http://steamcommunity.com/
workshop/
Ever dreamed of seeing your brilliant ideas come to life in games played by millions of people? Now you can, with the Steam Workshop. Here you can submit, find, rate, and download new content and modifications for your favorite Steam games. Different games may use the Steam Workshop in different ways, but everything here is created by members of the Steam community, just like you.
Once you have finished creating your workshop collection you can start adding the content to your server following these steps:
- From the steam community link, grab the Workshop collection ID, the URL will look like this example

The numbers after id= is what we need (The collection that we are using for this example contains Competitive “se” maps with Mirage) - We will also need the ID for the map on which the server will initialize, from your workshop collection choose your desired map to start the server on, this will take you to a different URL that will look similar to the previous example: http://
steamcommunity.com/ sharedfiles/filedetails/?id= 125488374 (The numbers at the end are the ones we need, this ID belongs to de_dust_se map) - Now the last step before we add them to the server is to get your Steam Web API key, you can generate one from here. Your auth key is tied to your steam account, so keep it private.
- We have finally gathered all our necessary data to get started, to add you workshop collection to your server login to the EnviousHost control panel at http://cp.envioushost.com click on Game Services –> Choose the server that you’ll be modifying in case you have more than one.
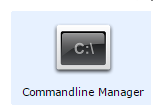
- Now that you are at your server’s control panel home page, click on Commandline Manager
On the next page select the Custom Commandlines tab

Click on the New button

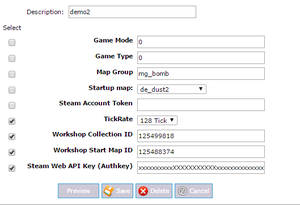
Modify the command line to include the data you have gathered from the Workshop URL as follow:

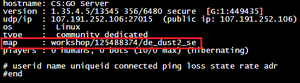
- Save the command line and restart your server, once you have restarted your server it will start downloading your workshop collection’s maps, if you type status in your server’s web console you will see something like this which indicates that the server is running your Workshop collection maps:


Once you have followed these steps, you will have a server up and running with your favorite workshop collection!